
Welcome! This manual provides essential guidance for operating and maintaining your Craftsman push mower, ensuring years of reliable lawn care performance.
Familiarize yourself with controls, safety features, and proper techniques for optimal results, as detailed within these pages.
Understanding Your Model
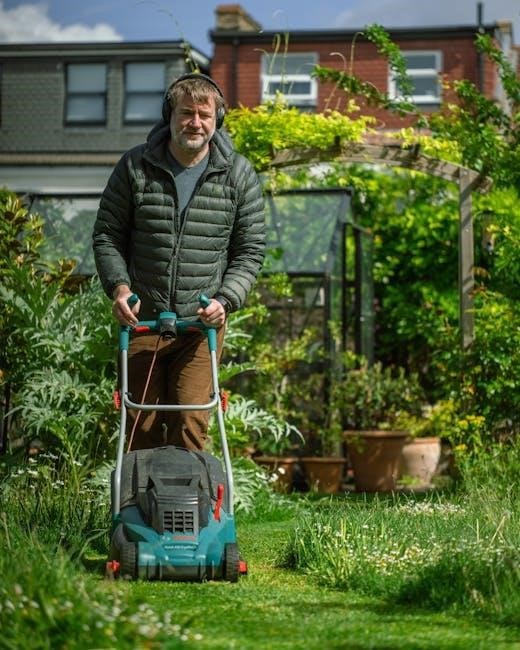
Craftsman push mowers come in various configurations, but core components remain consistent. Key features include the engine, blade, deck, handle, and controls – starter, cutting height adjustment, and discharge chute.
Newer models may incorporate software limitations affecting daily runtime, differing from older, unrestricted versions. It’s crucial to identify your specific model (305, 310, or 315 series) as hardware is often identical, with limitations applied via software.
Before operation, compare illustrations in this manual with your mower to locate controls and adjustments. Always ensure the mulcher door is closed or the side discharge deflector is correctly installed for safe operation.
Safety Precautions
Prioritize safety! Never operate the mower without a properly installed discharge chute or mulcher door. Keep hands and feet clear of the rotating blade at all times. Before any maintenance, disconnect the spark plug wire to prevent accidental starting.
Ensure the lawn is clear of objects that could be thrown by the blade. Never operate the mower while under the influence of drugs or alcohol. Always wear appropriate safety glasses and sturdy footwear.
Inspect the mower before each use, checking for loose parts. Never attempt to repair the mower while it is running. Be aware of your surroundings and potential hazards while mowing.
Assembly and Initial Setup
Begin with care! Carefully unpack your Craftsman mower and verify all components are present. Follow the step-by-step instructions for a secure setup.
Attaching the Handle
Securely fasten the handle to the mower chassis using the provided bolts and washers. Ensure proper alignment of the handle with the mounting points before tightening. A firm push is needed for optimal control. Double-check that all bolts are tightened securely to prevent wobbling during operation.
Refer to the diagrams in the manual for correct handle positioning. Improper attachment can affect maneuverability and safety. Take your time and ensure a robust connection. The handle provides essential leverage for steering and controlling the mower, so a secure fit is paramount. Verify the starter handle is accessible and functions smoothly after attachment.
Installing the Side Discharge Chute
Attach the side discharge chute firmly to the designated opening on the mower deck. Ensure it clicks or locks into place securely, preventing accidental detachment during mowing. The chute directs grass clippings away from the operator and provides a neat finish to your lawn.
Verify the chute is properly aligned with the mower deck to avoid clogging or uneven discharge. Before use, confirm the mulcher door is closed if you aren’t using the side discharge. Always use a firm push when mowing. Never operate the mower without the discharge chute or a properly installed mulching plug for safety reasons.
Checking Oil and Fuel Levels
Before each use, verify the engine oil level. Locate the dipstick, remove it, wipe clean, reinsert fully, and then remove again to check the oil level. Add oil as needed, ensuring you use the recommended type specified in this manual.
Similarly, check the fuel level. Use fresh gasoline to prevent engine issues; starting fluid can assist with initial starts after storage. Avoid operating “without oil or gasoline in the engine.” Old gas can cause starting problems, so fuel stabilization is crucial for winter storage.

Operating Instructions
Begin with a firm push to engage the blade, ensuring the side discharge deflector is installed and the mulcher door is closed for safety.

Starting the Engine
Before attempting to start, always verify oil and fuel levels are correct. Ensure the starter handle is unobstructed and the mower is on a level surface. Prime the engine by pressing the primer bulb several times – typically three to five pumps – until fuel is visible.
Next, set the throttle to the ‘choke’ position, if applicable, especially for cold starts; Grip the starter handle firmly and pull with a smooth, deliberate motion. If the engine doesn’t start immediately, repeat the process.
If still unsuccessful, a quick spray of starting fluid into the air intake can assist, particularly after prolonged storage. Once started, gradually adjust the choke to the ‘run’ position.
Adjusting Cutting Height
Your Craftsman mower features adjustable cutting heights to accommodate varying grass lengths and preferences. Locate the height adjustment levers, typically found near each wheel. These levers control the distance between the blade and the ground.
Most models offer multiple height settings, often indicated by numbers or positions. To raise the cutting height, move the levers towards higher numbers or further away from the mower deck. Lowering the height involves the opposite action.
Important: Always adjust all four wheels to the same height setting to ensure an even cut. Regularly check and readjust as needed based on grass growth conditions.
Proper Mowing Techniques
For a healthy, well-maintained lawn, overlap each mowing pass by a few inches. This prevents scalping and ensures a consistent cut. Avoid cutting more than one-third of the grass blade length at a time to prevent stressing the grass.
Vary your mowing pattern each time to promote even growth and prevent soil compaction. When mowing around obstacles, reduce speed and be mindful of the mower’s maneuverability – it needs forward motion for blade engagement.
Remember: A firm, steady push provides the best results. Regularly inspect the lawn for debris before mowing and remove any objects that could damage the blade or be thrown during operation.

Maintenance and Care
Regular upkeep is crucial for longevity! Sharpen blades, clean/replace the air filter, and maintain the spark plug for peak performance and reliability.
Blade Sharpening
Maintaining a sharp blade is paramount for a clean, healthy cut and efficient operation. Dull blades tear grass, stressing the lawn and increasing the risk of disease. Regularly inspect the blade for nicks, dull edges, or damage.
To sharpen, disconnect the spark plug wire for safety! Secure the blade and use a metal file or a blade sharpening tool to restore the original angle. Ensure both cutting edges are equally sharpened for balanced performance.
After sharpening, balance the blade using a blade balancer; an unbalanced blade causes excessive vibration and potential damage. Reinstall the blade securely, and always double-check before starting the mower.
Air Filter Cleaning/Replacement
A clean air filter is crucial for optimal engine performance and longevity. A dirty filter restricts airflow, leading to reduced power and increased fuel consumption. Regularly inspect the air filter – typically before each mowing season and after every 25 hours of use.
If the filter is lightly soiled, gently tap it to remove loose debris or use compressed air (blowing from the inside out). For heavily soiled filters, replacement is recommended.
Ensure the new filter is properly seated and secured before restarting the engine. Neglecting air filter maintenance can cause significant engine damage over time, so prioritize this simple task.
Spark Plug Maintenance
Regular spark plug maintenance ensures reliable engine starting and efficient combustion. Inspect the spark plug annually, or more frequently if you experience starting difficulties. Disconnect the spark plug wire before any inspection or replacement to prevent accidental starting.
Check the electrode for fouling – carbon buildup indicates a rich fuel mixture. Clean the plug with a wire brush or replace it if heavily fouled or damaged. Ensure the correct spark plug gap (refer to your engine specifications) before reinstalling.
A properly functioning spark plug is vital for optimal engine performance and fuel economy. Ignoring spark plug maintenance can lead to hard starting, misfiring, and reduced power.
Troubleshooting Common Issues
Facing problems? This section addresses frequent concerns like starting failures, uneven cuts, and overheating, offering solutions to get your mower running smoothly.
Engine Won’t Start
Difficulty starting your Craftsman mower? First, ensure fresh gasoline is in the tank and the fuel shut-off valve is open. A common issue is a clogged carburetor; try spraying starting fluid into the air intake – if it briefly starts, the carburetor needs cleaning or repair.
Also, verify the spark plug is clean and properly gapped. If the engine still fails to ignite, check the safety bail; it must be fully engaged. Remember, older mowers may simply require more effort after prolonged storage. Don’t forget to prime the engine several times before attempting to start it!
Uneven Cut
Experiencing an uneven cut with your Craftsman mower? Dull blades are the most frequent culprit – sharpen them regularly for a clean, consistent trim. Ensure the deck is level; an uneven deck will result in scalping or uncut patches.
Also, verify the tire pressure is correct; unevenly inflated tires can affect the deck’s stability. Mowing speed impacts cut quality; avoid rushing. If you’ve recently sharpened the blades, ensure they’re installed correctly and securely. Finally, remember that attempting to cut grass that is too tall in a single pass can lead to an uneven finish.
Mower Overheating
If your Craftsman mower is overheating, immediately stop the engine and allow it to cool down. A clogged air filter is a common cause, restricting airflow and increasing engine temperature. Clean or replace the air filter as needed.
Check the engine oil level; low oil can lead to excessive friction and overheating. Ensure the cooling fins on the engine are free from debris like grass clippings. Avoid operating the mower under heavy loads for extended periods, especially in hot weather. If overheating persists, consult a qualified service technician.

Specific Model Considerations (310 Series)
310 Series models may have software limitations on daily usage, differing from older versions; hardware remains consistent across 305, 310, and 315 models.
Hardware Differences Between Models (305, 310, 315)
Interestingly, despite differing model numbers – 305, 310, and 315 – the underlying hardware components are often identical, particularly in newer production runs. This includes the engine, battery (if applicable), and core chassis design. The primary distinction lies in software limitations imposed by the manufacturer.
Lower-numbered models, like the 305, may have restricted run times or features compared to the 310 or 315. Older 310 series mowers, however, frequently lack these software constraints, offering unrestricted performance. Essentially, you might find a 305, 310, and 315 with the same physical parts, but varying operational capabilities due to programmed limitations.
Software Limitations on Newer Models
Recent Craftsman push mower models increasingly incorporate software limitations to differentiate between series (305, 310, 315). These restrictions aren’t related to hardware capability, but rather programmed constraints on daily usage. For example, a 305 model might be limited to a specific number of operating hours per day, while a 315 model has no such restriction.
This means the physical components – engine, battery, and blade – are identical, but the software dictates how long and intensely the mower can operate. Owners of newer models should be aware of these limitations, as they can impact performance during larger lawn maintenance tasks. These limitations are not present in older models.
Winter Storage
Proper winterization is crucial for preserving your mower’s longevity. Stabilize fuel and address battery care to ensure easy spring start-up and optimal performance.
Fuel Stabilization
Preparing your Craftsman mower for winter storage requires attention to the fuel system. Gasoline degrades over time, potentially causing starting problems and carburetor issues in the spring. To prevent this, it’s highly recommended to use a fuel stabilizer.
Add fuel stabilizer to the gasoline tank according to the manufacturer’s instructions before your final mow of the season. Run the engine for a few minutes to ensure the stabilized fuel circulates throughout the fuel system, including the carburetor.
Alternatively, you can drain the fuel tank completely. If draining, do so outdoors and away from any ignition sources. Dispose of the fuel responsibly, following local regulations. Starting fluid can assist with initial spring starts, especially after prolonged disuse, but fresh fuel is always preferable afterward.

Battery Care (If Applicable)
If your Craftsman push mower is equipped with an electric start, proper battery care is crucial for reliable operation. Newer models may feature software limitations impacting battery usage, so understanding your specific model is key.
During winter storage, disconnect the battery to prevent parasitic drain. Clean the battery terminals with a wire brush to remove any corrosion. Fully charge the battery before storage and periodically throughout the winter months – approximately every 4-6 weeks – using a battery maintainer or trickle charger.
Store the battery in a cool, dry place, avoiding extreme temperatures. Check the electrolyte level (if applicable) and top off with distilled water as needed. Remember, battery performance diminishes over time, so consider replacement if it consistently fails to hold a charge.